前言
自己现在家中有一台自己组的 All in One 服务器,系统是 PVE,在上面跑了个虚拟机 OpenWRT 承担家里旁路网关的功能,起初用的国内不知道谁编译的版本,后面自己编译了官方 22.05 版本,添加上自己想要的功能一直稳定运行了 2 年,但是 All in One 最大的问题就是宿主机重启,因为最近折腾显卡直通需要不断重启 PVE,这时要是家里领导在打王者掉线了就有的好受了,所以趁着 618(没错 618 到现在才开始折腾)下手了一台 R2S,彻底杜绝家里领导找茬的机会。
需求
基本是目前虚拟机上 OpenWRT 功能的移植:
- Wireguard
能通过 Wireguard 结合家里的公网 ip 从公司访问家里网络
- 自定义域名
通过自定义域名和 Nginx 实现域名访问自部署的服务,不用记 ip 和端口,不用维护 dashboard 服务
- DDNS 服务
自动更新公网 ip,防止每次拨号之后 Wireguard 失联
- KMS 服务
windows 激活
- 懂的都懂需求
如题,不做展开
R2S 系统安装
下面我们就一步步实现上面的需求,首先是系统的选用,依照官网介绍选择官方自己维护编译的 OpenWRT 发行版,对与 Docker 目前是没有需求的,但为了防止以后有需要的时候还得自己安装,所以我们直接一步到位,选择官方基于 OpenWrt 22.03 构建的带 Docker 的FriendlyWrt 固件
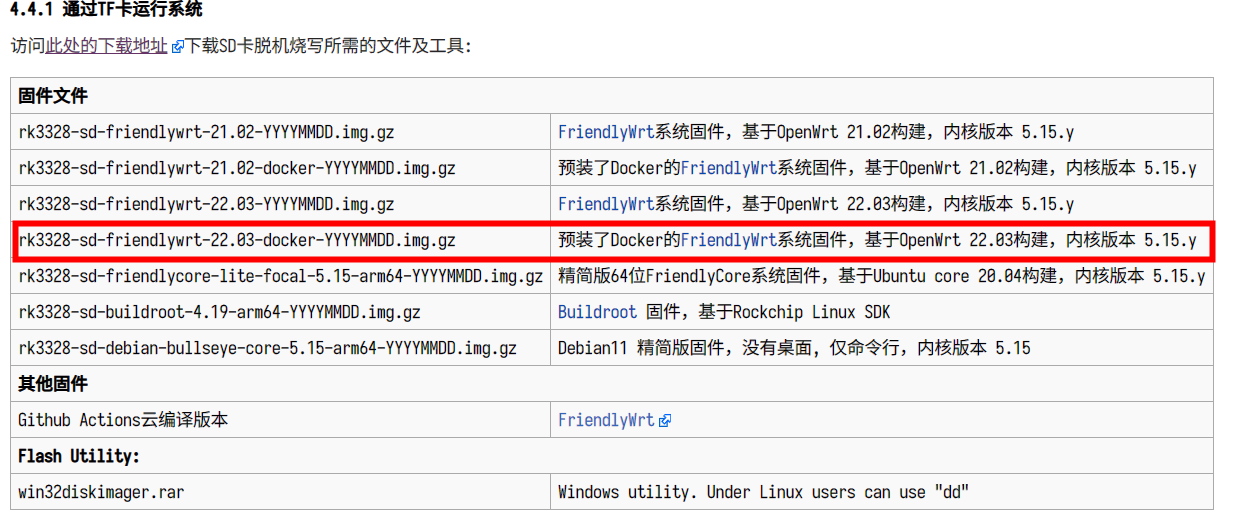
接下来就是烧录固件到 TF 卡,插电开机。
系统配置
插上网线,更改电脑 ip 为192.168.2.100,系统默认 ip 为192.168.2.1,配置的客户机 ip 也要在192.168.2.0/24网段才能互访,现在使用 ssh 访问 openwrt 后台:
默认密码为password 首先改个安全密码
passwd root
修改 ip 地址
首先修改 ip 使其具有互联网访问能力
vi /etc/config/network
找到config interface 'lan'处,修改如下:
config interface 'lan'
        option device 'br-lan'
        option proto 'static'
        option netmask '255.255.255.0'
        option ip6assign '60'
        option ipaddr '192.168.5.99'
        option gateway '192.168.5.1'
上面掩码和网关需要依据家里的网络环境修改,我的虚拟机 openwrt 目前具有良好的网络访问能力,所以网关设置为了虚拟机 openwrt 的 ip,还有要注意的就是 ip 不能冲突了。
修改 DNS
vi /etc/config/dhcp
dnsmasq 配置选项下新增list server '192.168.5.1' dncp ’lan’配置选项下 option ignore 要改为 1,对应 web 界面的忽略此接口
config dnsmasq
        option domainneeded '1'
        option boguspriv '1'
        option filterwin2k '0'
        option localise_queries '1'
        option rebind_protection '1'
        option rebind_localhost '1'
        option local '/lan/'
        option domain 'lan'
        option expandhosts '1'
        option nonegcache '0'
        option authoritative '1'
        option readethers '1'
        option leasefile '/tmp/dhcp.leases'
        option resolvfile '/tmp/resolv.conf.d/resolv.conf.auto'
        option nonwildcard '1'
        option localservice '1'
        option ednspacket_max '1232'
        option confdir '/tmp/dnsmasq.d'
        list server '192.168.5.1'

config dhcp 'lan'
        option interface 'lan'
        option start '100'
        option limit '150'
        option leasetime '12h'
        option dhcpv4 'server'
        option dhcpv6 'server'
        option ra 'server'
        list ra_flags 'managed-config'
        list ra_flags 'other-config'
        option ignore '1'

config dhcp 'wan'
        option interface 'wan'
        option ignore '1'

config odhcpd 'odhcpd'
        option maindhcp '0'
        option leasefile '/tmp/hosts/odhcpd'
        option leasetrigger '/usr/sbin/odhcpd-update'
        option loglevel '4'
执行命令检测互联网访问能力
curl https://baidu.com
证书报错
root@FriendlyWrt:~# curl https://baidu.com
curl: (60) Cert verify failed: BADCERT_FUTURE
More details here: https://curl.se/docs/sslcerts.html

curl failed to verify the legitimacy of the server and therefore could not
establish a secure connection to it. To learn more about this situation and
how to fix it, please visit the web page mentioned above.
网络是连通了互联网的,其他机器也能正常上网,查了一下是机器时间有问题:
root@FriendlyWrt:~# date
Fri Jan 22 17:07:48 CST 2016
查看 ntp 服务
root@FriendlyWrt:~# ps | grep ntp
 3942 root      2592 S    {ntpd} /sbin/ujail -t 5 -n ntpd -U ntp -G ntp -C /etc/capabilities/ntpd.json -c -u -r /bin/ubus -r /usr/bin/env -r /usr/bin/jshn -r /usr/sbin/ntpd-hotplug -r /usr/share/libubox/jshn.s
 3954 ntp       1320 S    /usr/sbin/ntpd -n -N -S /usr/sbin/ntpd-hotplug -p 0.openwrt.pool.ntp.org -p 1.openwrt.pool.ntp.org -p 2.openwrt.pool.ntp.org -p 3.openwrt.pool.ntp.org
 5678 root      1572 S    grep ntp
修改 ntp 为阿里 ntp
vi /etc/config/system
config system
        option log_size '64'
        option urandom_seed '0'
        option hostname 'FriendlyWrt'
        option ttylogin '1'
        option timezone 'CST-8'
        option zonename 'Asia/Shanghai'

config timeserver 'ntp'
        option enabled '1'
        option enable_server '0'
        list server 'ntp.aliyun.com'
        list server 'ntp1.aliyun.com'
        list server 'ntp2.aliyun.com'
        list server 'ntp3.aliyun.com'

config led 'led_wan'
        option name 'WAN'
        option sysfs 'wan_led'
        option trigger 'netdev'
        option mode 'link tx rx'
        option dev 'eth0'

config led 'led_lan'
        option name 'LAN'
        option sysfs 'lan_led'
        option trigger 'netdev'
        option mode 'link tx rx'
        option dev 'eth1'
重启服务
/etc/init.d/sysntpd restart
查看时间
root@FriendlyWrt:~# date
Mon Aug  7 14:56:10 CST 2023
查看证书问题是否报错
root@FriendlyWrt:~# curl https://baidu.com
<html>
<head><title>302 Found</title></head>
<body bgcolor="white">
<center><h1>302 Found</h1></center>
<hr><center>bfe/1.0.8.18</center>
</body>
</html>
正常的 302 重定向
修改源(可选)
FriendlyWrt 固件使用的是腾讯源, 由于虚拟机 openwrt 使用的是清华源,所以保持一致以免软件包版本冲突:
sed -i -e 's/mirrors.cloud.tencent.com/mirrors.tuna.tsinghua.edu.cn/g' /etc/opkg/distfeeds.conf
更新索引
opkg update
Wireguard
安装
系统配置好之后添加 Wireguard 内核模块和工具包
opkg install kmod-wireguard wireguard-tools
检查内核是否加载了 wireguard 模块
lsmod | grep wireguard
出现如下字样说明成功加载 wireguard 模块
root@FriendlyWrt:~# lsmod | grep wireguard
wireguard              77824  0
libchacha20poly1305    16384  1 wireguard
libcurve25519_generic    40960  1 wireguard
udp_tunnel             24576  3 l2tp_core,wireguard,vxlan
ip6_udp_tunnel         16384  3 l2tp_core,wireguard,vxlan
生成公私钥对
wg genkey | tee privatekey | wg pubkey > publickey
以上命令生成公私钥文件分别存储到privatekey和publickey中 配置 wireguard 接口
vi /etc/config/network
末尾添加以下内容, 大括号里的内容记得替换
config interface 'wg0'
        option proto 'wireguard'
        option private_key '{private_key}'
        option listen_port '25378'
        list addresses '192.168.7.1'
重启 network 服务
/etc/init.d/network restart
查看 wireguard 状态
root@FriendlyWrt:~# wg
interface: wg0
  public key: fTaGpi1YIlS6RTsWSjsHoWMHY1drWe/CTTOK/EUFTUE=
  private key: (hidden)
  listening port: 25378
以上步骤也可以在 web 端进行,web 端需要安装 luci 支持:
opkg install luci-i18n-wireguard-zh-cn
Web 端
公网访问
目前我的家庭网络拓扑如下:
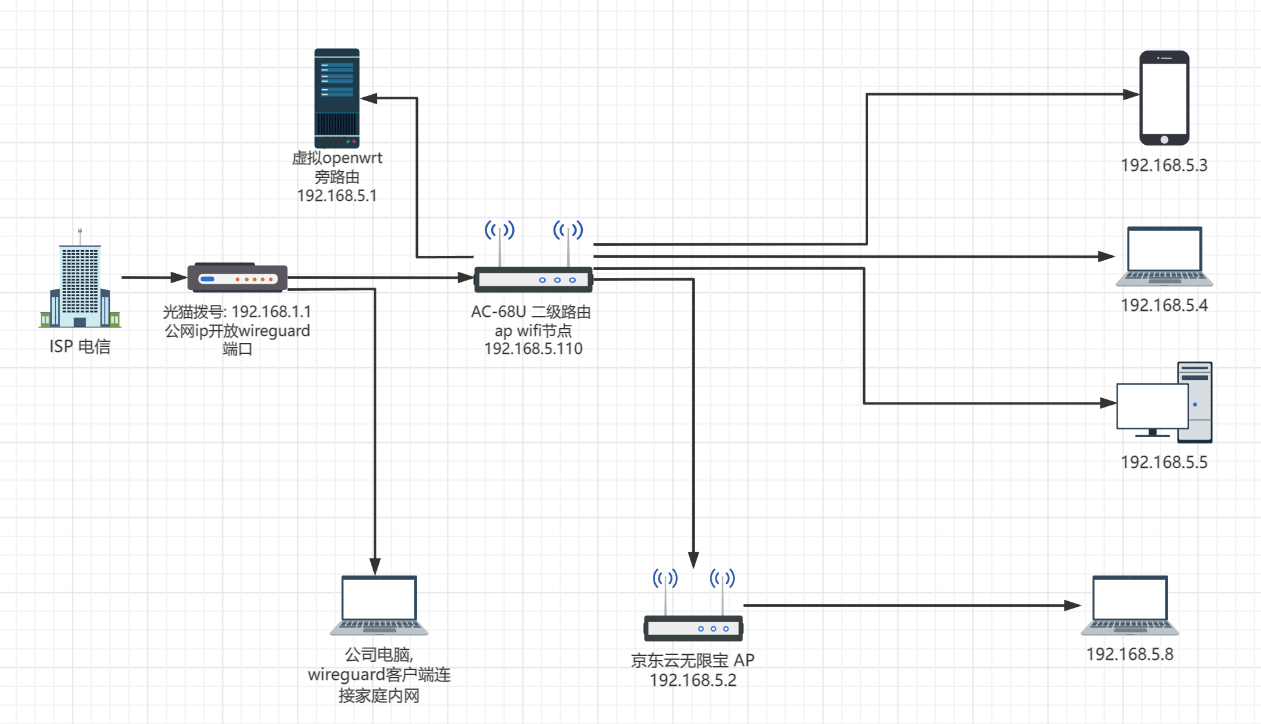
坐标上海,电信光猫拨号,有公网 ip,可以看到虚拟机 openwrt 位于 2 级路由之下,这是要将 openwrt 的端口转发出去需要二级路由AC-68U转发一次,再经过光猫转发一次,较为麻烦,所以在安全的前提下我在电信 app 上面将二级路由 DMZ 出去,开启二级路由防火墙,再使用二级路由的端口转发功能将 wireguard 端口转发出去即可,这样公网接管了二级路由的所有端口,以后也方便配置各种端口转发。
注意千万别将 openwrt 的 web 端口 80 和 ssh 端口 22 转发到公网,这样黑客扫到开盒是早晚的事。
windows 客户端配置
windows使用官方的wireguard 客户端,新建空隧道:
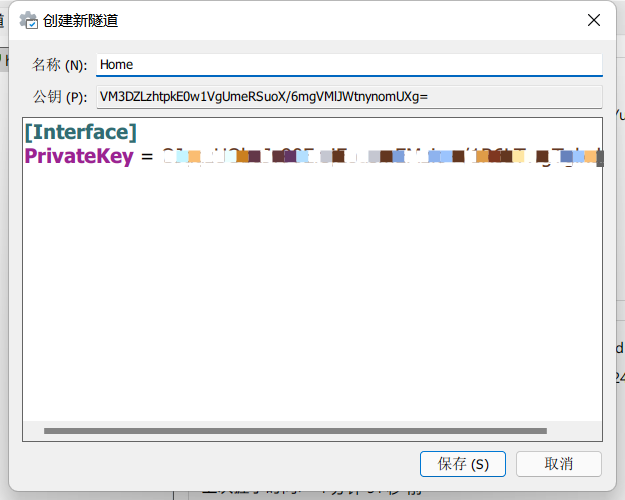
会自动生成公私钥对,然后填写配置:
[Interface]
PrivateKey = {privatekey}
Address = 192.168.7.2/32
DNS = 192.168.7.1
MTU = 1300

[Peer]
PublicKey = {openwrt_publickey}
AllowedIPs = 192.168.7.0/24,192.168.5.0/24
Endpoint = {公网ip}:{转发端口}
PersistentKeepalive = 25
- Interface 配置
- PrivateKey: 自动生成的私钥,不需要修改
- Address: 当前节点的 ip 地址,需要和后面配置的对端地址相同
- DNS: 使用 openwrt 提供的 dns 服务,用到自定义域名的时候有用,在公司也能访问内网的域名
- MTU: 默认 1500,影响发包的性能,这个需要自己去试,小一点可以提升一点网络性能,不是太在意的话默认 1500 即可。
- Peer 配置
- PublicKey: 填写 openwrt 的公钥
- AllowedIPs: 允许访问的网段,这里填写家里内网网段即可,如果需要 wireguard 作为所有网段隧道填写 0.0.0.0/0,需要 openwrt 防火墙配置正确才能访问互联网。
- Endpoint: 公网转发出来的 wireguard 地址和端口
- PersistentKeepalive: 保活时间,设置为 25s
配置对端
windows 配置完之后还没完,openwrt 上还要进行相应配置:
vi /etc/config/network
添加如下配置:
config wireguard_wg0
        option route_allowed_ips '1'
        option persistent_keepalive '25'
        option public_key 'VM3DZLzhtpkE0w1VgUmeRSuoX/6mgVMlJWtnynomUXg='
        option description 'Worklaptop'
        list allowed_ips '192.168.7.2'
重启网络服务
/etc/init.d/network restart
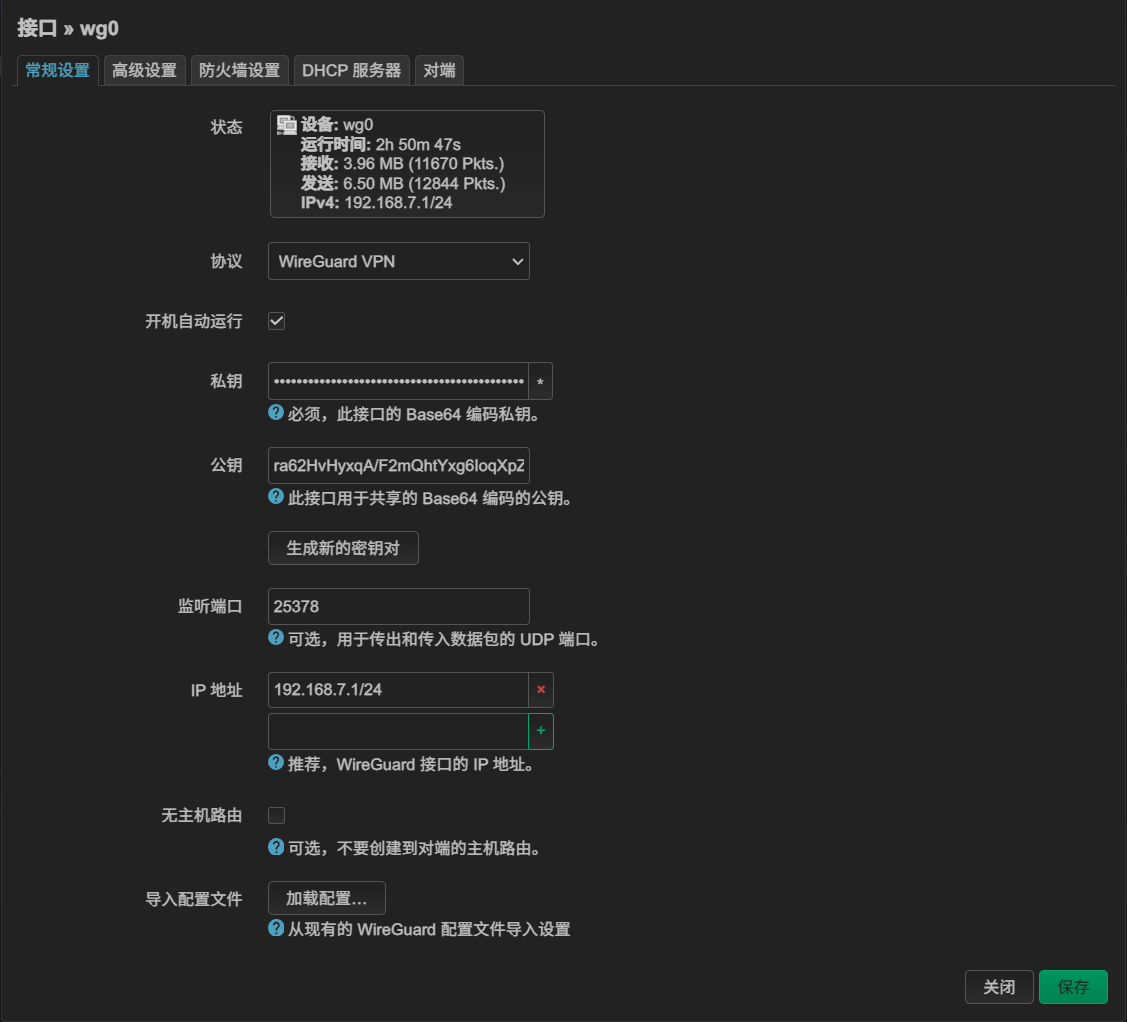
windows 客户端点击连接:
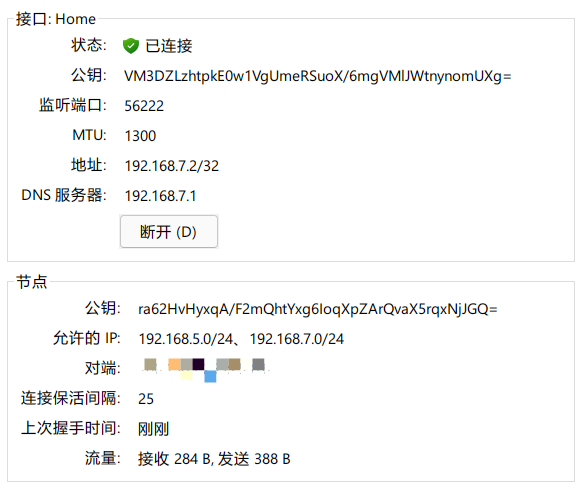
流量收发正常即表示连接成功,ping 一下网关测试一下:
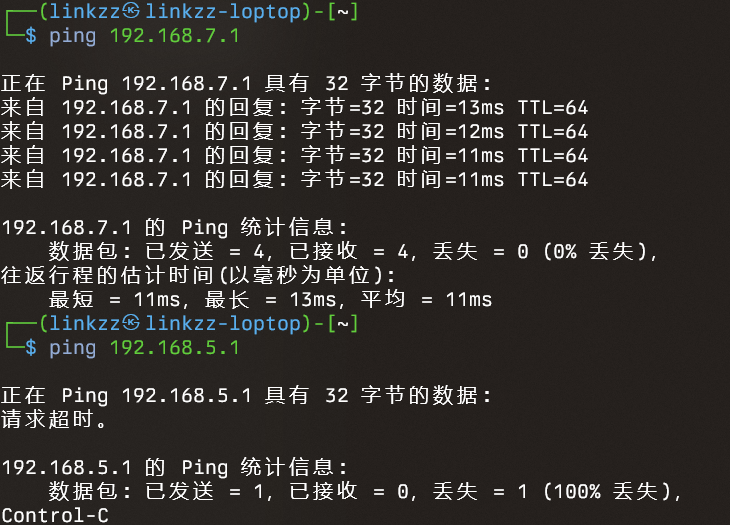
对端连接成功,但是访问内网192.168.5.0/24网段显然是不行的,这是因为防火墙将来自 wireguard 的网络访问转发给 lan 接口,下面我们就开始配置防火墙。
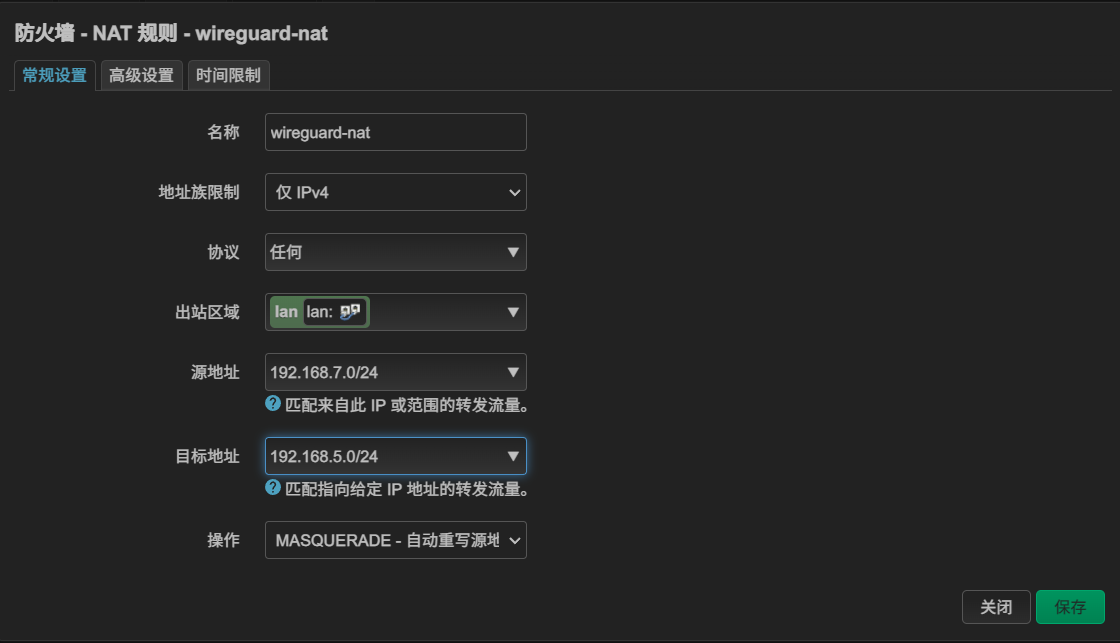
防火墙配置
通过 openwrt Web 端,“网络” -> “防火墙” -> “NAT 规则”,配置一个地址的nat,转发来自192.168.7.0/24网段的流量到 lan 接口,这样即可实现内网网段的访问,当然如果需要 wireguard 具备访问所有网段的能力,将目标地址设为任意即可。
小结
本章我们实现了 openwrt 的第一个功能,外网访问内网即 VPN 的功能,让我们可以不用担心各种端口转发暴露内网风险,实现方便安全的访问家庭内网的能力,接下来我们继续实现第二个需求,自定义内网域名。